Thursday, June 28, 2007

#001, Part 2...

Its still a bit "fuzzy" and needs some finish sanding, but shaping for numero uno is almost done. Its not without its flaws, but it sure was an eye opening experience. For the most part, I think I did an ok job, but I got a little carried away with the planer and surform here 'n there. What can I say, I guess I was just having too much fun! The thing is like 2" thick and the rails and tail feel super thin. I think my concaves are too deep and lack the smooth transition that I envisioned in my mind. Guess thats what I get for trying to do too much too early. Nonetheless, it should be interesting how these "mistakes" feel in the water.

Started off the night by making some rail bands. Here's a shot of post-bottom band, and post-first top band...


Not sure if the nose needs some tuning, I don't want to make it much thinner than it already is...


Here's my attempt at bottom contours. For my first board I probably should've kept things simple, but I'm glad I gave it a try. I figure its better to get some experience with these things sooner than later. Single concave under front foot...


...double concave under back foot...

...and vee out the tail...


Adjusted the lighting to bring out the concave shadows. Ooops!...a bit deeper than I intended. Will try to smooth out the concaves later.


Looking pretty ok from afar...


Just need to wait for some resin and fiberglass in the mail, and I'll attempt to glass the sucker. BTW, I'm terrified of glassing...

kc

Monday, June 25, 2007

#001, Part 1...

Ok, after almost two months of talking, I'm finally gonna make this happen. It took me way too long to get here, but I've finally begun shaping my #001. I decided that I'd use my practice blank and turn it into a real board. That being the case, I needed a template and so I cut out the outline of my 5'10 JC SD3 onto a piece of cardboard from the box that my KingMac blanks were delivered in. I know that cardboard isn't the best material to use, I would rather use masonite, but I couldn't be bothered to be too picky at this point. In fact, it was rather convenient because I cut the template in two which made it much easier to transport on the subway. Maybe next time I should try making a spin template?


Anyways, back at the shaping bay, after taping my template back together I was ready to begin. I took my "practice" blank and measured the thickness. It was just over 2.5" thick but I decided I wanted to take it down to about 2.25" when all was said and done. I also made some lines across the board and compared thicknesses at various points to see how the thickness compared from one side to the other.


Having my new exhaust system plugged in and ready to go, I turned the planer on to start taking the thickness down. After a few passes, I realized that the exhaust system had one slight drawback - as I stretched, tugged, and pulled against the exhaust hose, it resulted in my planer tilting and planing crooked. Deeeaaamn!! Well, at least there was no mess on the floor, instead the mess was on my blank, check out these nasty lines and ridges...


With all due respect, I don't care what Jim Phillips says in his Master Shaper videos, as a complete newbie I needed the security of a crutch tool....my trusty Surform. With crutch tool in hand, I proceeded to Surform my way out of trouble. Learning from my previous mistakes while Surforming my practice blank, I made certain I would not catch the Surform edge thus tearing the foam (didn't matter...I still made the same mistake anyways). After about ten times the amount of time it took for me to create the problem with the planer, I Surformed the mistakes out and was left with a respectable result. Now it was time to find the "true" center line (not necessarily the stringer) to use when aligning my template. This I did by snapping a chalkline down the middle just like my old friend J. Phillips suggests. Sure enough as you can see, the stringer wasn't perfectly straight...


After aligning the template, and tracing the outline, it was time for the only tool with which have any prior experience - the handsaw (not that my prior experience helped any). At first the saw skipped and jumped, but after relaxing my grip and taking longer strokes (ahem, get yer mind out of the gutter) the saw cut like a lukewarm knife through lukewarm butter - albeit crooked...


At this point I noticed that my shaping rack was too wide and the board kept falling into the gap between the uprights. I had to balance it on one side of the rack to prevent my saw from hitting the "T" part of the uprights. Guess I'll need rebuild the damn things. Grr!!!

Again, I depended on the Surform (this time the little one) to clean up my crappy outline cutting job. I tried using the planer, but I couldn't get the board to sit steady on the rack (see previous paragraph) so I didn't risk it. I also took this opportunity to knock down the stringer with the hand planer. Dunno if its just me, but why does it feel so satisfying to use the hand planer to cut the stringer down resulting in those curly wooden springy shavings?...


Next challenge...bottom contours. Stay tuned.

Thursday, June 21, 2007

Exhaust-O-Matic

Using the goodies I picked up from Home Depot yesterday, tonight I assembled something like the vacuum exhaust system diagrammed in the back of the Clark Foam catalog. Everything went pretty smoothly actually, thanks to careful planning and an abundance of available supplies at HomeDepot. All the parts fit like a piece of furniture straight out of an Ikea catalog. Here's how it went down...(apologies for crappy cellphone pic quality)...

1) Attach one long PVC pipe (or in my case, 4 short ones connected together) across the ceiling from the area above the racks to wherever the vacuum will be...


2) Next, attach PVC elbows to both ends as well as rubber adapters to help accomodate different hose/PVC tube sizes...


3) Now attach the planer exhaust tube and the shopvac tube to the corresponding PVC ends/elbows...


4) Attach each tube to the relevant piece of machinery...


4) Now set up a couple pulleys along the planer's power cord, as well as hooks in the ceiling where the pulleys will hang...


5) Now, mount one pulley on each hook...


7) Thats it! All done! The weight of the power cord keeps the slack in check while still allowing free movement of the exhaust tubing. I tried wrapping the power cord around the exhaust tube, like I've seen in other peoples' setups, but it actually hinders the exhaust's movement/stretchiness.


I didn't have a chance to test it out much tonight (would have some angry neighbors), but I'll see how it goes tomorrow when I finally get back to some shaping. Nonetheless, I did a few short passes just cause I had to know if it worked or not. Sure enough, the setup works and is as smooth as butter!

Mmmm butter....zzzzz...sleeeeepy.

kc

Lazy Summer Dayz

Must be the hot weather, the lazy haze in the sky, or the air conditioning headaches thats making me drag my feet these days. The water has gone flat for the most part, and its not looking good for surf for at least a week. *sigh*

In hopes of sparking some productivity, I visited the Home Depot store in Lodi, NJ last night. Talk about inspiration!!! I realized at the moment that I laid eyes on the lumber section, the tools department, and the countless rows of knicknack-filled bins, that I'd been doing things the hard way up until now. I had been visiting the local hardware store on the corner, the Home Depot "Lite" in Manhattan, and various other random places to pick up supplies and materials. In one fell swoop, I could've knocked out everything by visiting this one magnificent store (just 10 minutes from my house by ZipCar no less!!!). The grind of shopping for gear piecemeal from different locations around the city was really getting to me. Maybe thats why my momentum seemed to stall recently.

Well, I ended up buying all the parts necessary for my exhaust system as diagrammed in the Clark Foam catalog. Its the first time I've gone into a hardware store since I began this shaping obsession that I've actually been able to leave with every single thing I went in looking for.

I'll build the exhaust/vacuum system tonight, pics to come of my progress.

kc

Wednesday, June 13, 2007

My #0.5...

After that first night behind the planer, I just had to get dusty again.

So there I was, the very next evening, cranking away with the planer. Not surprisingly, my excitement nearly got me into trouble. No more than a few minutes into my shaping session, I was admiring my handiwork with the planer (still spinning) down at my side, when the planer's power cord touched the planer blades for a split second and got nicked down to the wire. Fortunately, only the sheath was nicked, but I was able to see the metal wire strands within. I'm not sure if this will pose a real threat, but I'll have to ask an electrician friend of mine what I should do. For now, I've just got it wrapped with duct tape.

Another lesson I learned real quick was...avoid the big cuts! It was so fun and easy to make big thick cuts with the planer for some reason, I just had to do it all over the freaking place. Maybe its because I had decided that this was a practice blank and would not eventually become a real board. Of course, this left me with tons of big ridges and uneven sections, a pain to correct. I ended up planing, surforming and sanding my mistakes away, but not after lots of sweat (was a hot summer night) and regret. Oh well, lesson learned I hope.

By the end of the night I decided that I'd try to finish skinning and smoothing out the deck and bottom. Hopefully this weekend I'll try truing up the outline of the blank (don't have a template yet) and turning the rails. And now that I think of it, and after some encouragement from Bubba in the previous post's comments, I think I will re-skin this thing and actually shape a real board out of it. Perhaps a rough replica of my 5'10 JC?

Laugh at will, here are the results of my shenanigans... (note duct tape on planer cord where it got nicked by planer blade).


If you look closely on this one, you can see where I got careless with the edge of the Surform...


Outline and rails coming soon....


Time to go home...


Till next time...
kc

Monday, June 11, 2007

First Pass

Very exciting news today, I made my first cut with the planer! After almost two months of preparation and planning, waiting for blanks, building out the garage/shaping room, I finally mowed my first piece of foam. Felt great! Using a throwaway blank to practice on kept the experience painless and carefree. I also practiced knocking down the stringer using various hand planes as well as taking some time to get to know my Surform. Was mostly a 'get-to-know-my-tools' kind of night.

Getting ready...

I look like a one-armed shaper in this pic...


A bit wiggly, but good enough...


Check out the big crack/gouge in the blank. Part of the reason this one was half price I guess...


Have to remember for next time - Pay attention to direction of the planer exhaust. Something I failed to do and ended up with a face/eye full of foam dust. Which reminds me that I need to buy some safety eyewear and/or build an exhaust rig using slinky hose and shopvac like this one shown in the Clark Foam catalog...


Can't wait to get back to the shop...I'm hooked now!

Friday, June 8, 2007

The wait is over!!!!

Yeeha, my KingMac blanks finally arrived today! These should keep me busy for the next few months at least. I'm planning on experimenting on the 'second' defective blank sometime this weekend. Not gonna try to shape anything, just wanna goof around, get to know my planer, and mow the thing down to nothing. I figure, it'll be my sacrifice to the shaping gods for good karma and shaping luck.


Sooo stoked!!!!

Wednesday, June 6, 2007

Bamboo Removeables

Yesterday during my usual lunchtime lurking of the Web (actually I lie...I lurk all day long) I stumbled upon a post on SurferMag's Design Forum that says Marlin Bacon of 101Fins, the guy behind the bamboo fins on my soon-to-arrive Mandala, will be releasing bamboo removables in the near future. The post indicated that he's taking pre-orders before advertising the new line on his website.


In a move to boost my shaper-ego, I decided to contact him in hopes of becoming part of the "pre-release" crowd who can say they own a set of these beauties. I anticipate saving these for my first fish, assuming I'm able actually shape one. Marlin responded to me within the hour and before I knew it, I had an order in for a set of CK (traditional twin keel) and K-9 (Speed Dialer-style quad) fins. After following up with him today for pricing/invoice, he said he'd throw in the shipping for me too. Good thing, considering the cost of these things....most likely, it will be well worth it though.

I feel like a broken record saying this, but blanks supposed to arrive this week.

Friday, June 1, 2007

Aku Shaper

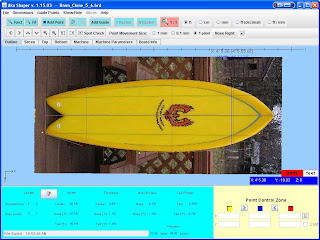
I've decided to try my hand at the Aku Shaper software to create an outline/template based off of my Brom fish. The software is not exactly the most intuitive thing to use (even for a computer guy like myself), but the interface is fairly simple and easy to figure out with a little time. I spent the greater part of last night making a board file by tracing a picture of the Brom fish. I'll then try to scale it down using Greg Loehr's "1/8" formula to come up with something a bit shorter and thinner.

I'm having trouble printing the outline onto paper which I'll then tape together to end up with the final outline. I think I need to fiddle with the printer margins or something cause I'm getting only 1/4 of the board. Weird. In any case, here are some screenshots of what I have so far...


I dunno if I'll make a rocker template, but I did the profile outline just for fun. I think there's a newer version of the Aku Shaper coming out soon which will feature a 3D viewer. Also, if you have $65,000 lying around, you can buy the Aku machine and have it cut your CAD board designs for you. If not, you'll have to settle for the free software (and find someone with the machine). You can find Aku Shaper here.

Blanks are on the way...should arrive sometime next week. Yeeha!